
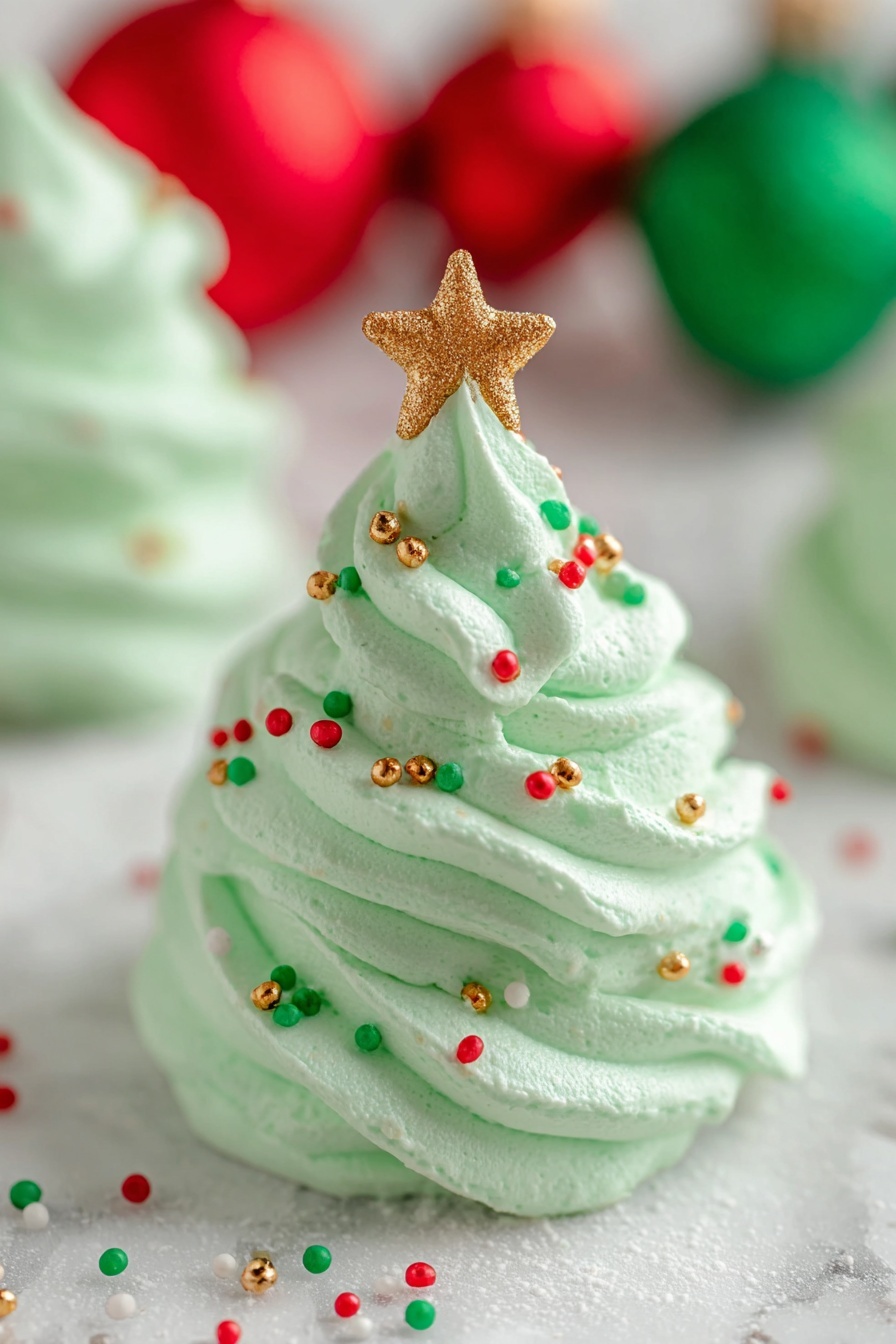
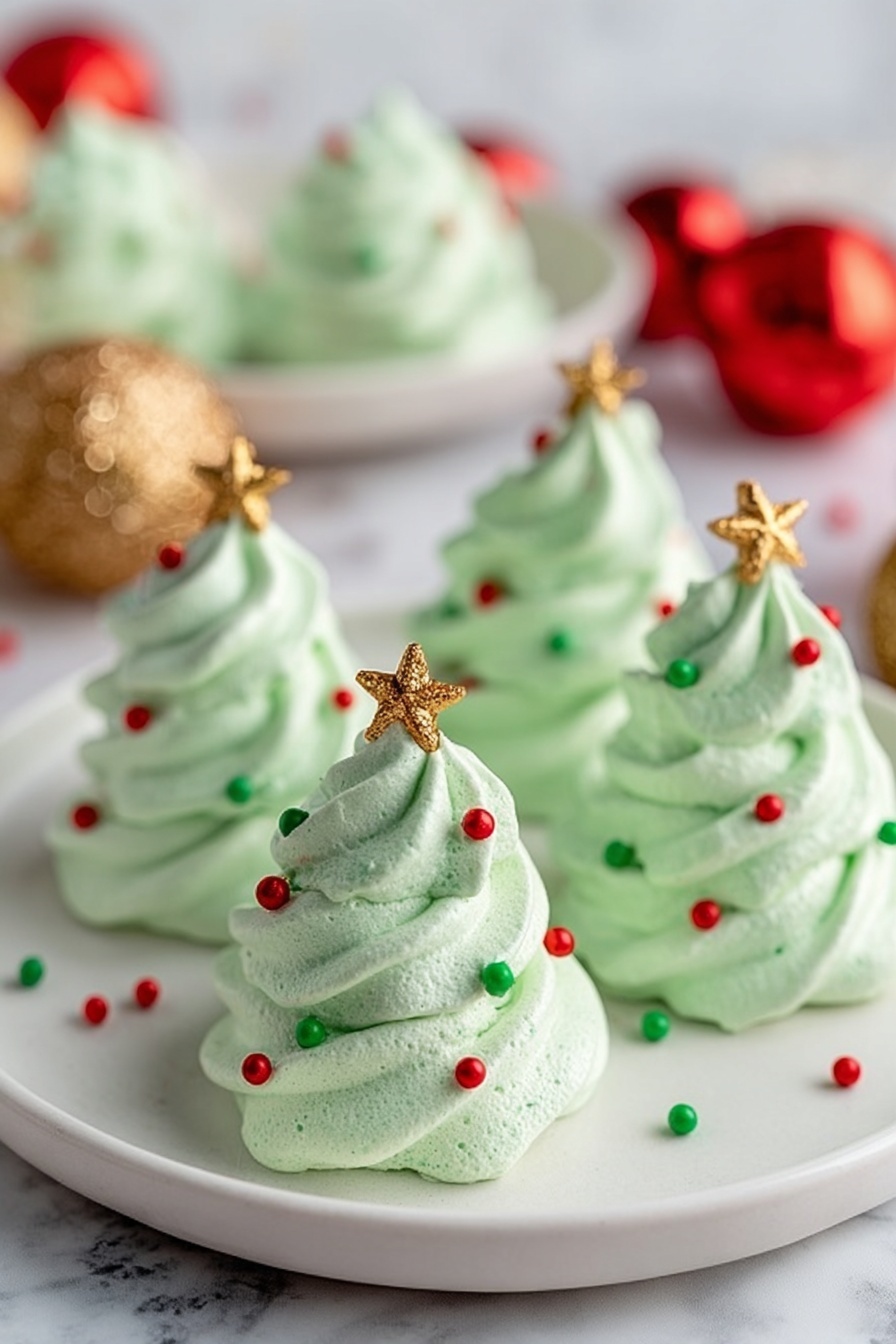
Hey friend! If you’re looking for a festive, light-hearted treat that dazzles at any holiday party, you have to try this Meringue Christmas Tree Cookies Recipe. These little beauties are crisp, airy, and charm with their vibrant green swirls and sprinkle “ornaments.” I promise, they’re surprisingly simple to make—and the best part is how stunning they look with minimal effort. Stick around, and I’ll walk you through every step, sharing tips that’ll make your batch-perfect and totally instagrammable.
Why You’ll Love This Recipe
- Easy & Elegant: Despite their fancy look, these meringue trees require just a handful of ingredients and basic kitchen tools.
- Customizable Fun: You can personalize the shade of green and sprinkle decorations to match your holiday theme perfectly.
- Make-Ahead Magic: These cookies keep beautifully for days, making holiday prep stress-free.
- Kid-Friendly Activity: Kids especially love piping the meringue into little Christmas trees—it’s a fun way to get them involved!
Ingredients & Why They Work
The magic behind this Meringue Christmas Tree Cookies Recipe lies in simple, quality ingredients coming together just right. Each component plays a crucial role to create that light, crisp meringue with a glossy finish, so choosing the right products and measuring accurately makes all the difference.

- Large egg whites: Room temperature whites whip up better volume and produce airy meringues with ease.
- Cream of tartar: This little acid stabilizes the egg whites and helps achieve those perfect stiff peaks.
- Granulated sugar: Added gradually, it dissolves fully ensuring a smooth, glossy texture without gritty bits.
- Vanilla extract: Just a touch to enhance flavor without overpowering the delicate sweetness.
- Green gel food coloring: Gel colors provide vibrant shades without thinning the meringue batter, crucial for maintaining structure.
- Round and star sprinkles (optional): For that adorable, festive “ornament” look that makes these cookies extra special.
Make It Your Way
While I love the classic Christmas tree shape and green swirl with colorful sprinkles, you can absolutely put your own spin on this Meringue Christmas Tree Cookies Recipe. I’ve had fun experimenting with flavor extracts and colors, and trust me, your creativity can really shine here!
- Flavor variation: I once added peppermint extract instead of vanilla—totally festive and refreshing. Just a tiny bit goes a long way!
- Color alternatives: You can switch up the gel food coloring to create different holiday themes, like red and white for candy cane vibes.
- Sprinkle swaps: Try edible glitter or chopped nuts if you want to skip traditional sprinkles but still want some sparkle.
- Mini trees: You can pipe smaller versions for bite-sized treats—perfect for cookie platters or kid’s lunchboxes.
Step-by-Step: How I Make Meringue Christmas Tree Cookies Recipe

Step 1: Prep Your Space and Oven
First things first, you want to preheat your oven to a very low 200°F (that’s critical for drying rather than baking these treats). Line two baking sheets with parchment paper because meringues stick terribly without it! I like getting all my tools ready now—it just sets you up for smooth sailing.
Step 2: Whip Up the Magic Base
Pop your room-temp egg whites and cream of tartar into a clean, grease-free bowl—trust me, even a speck of oil kills volume. Whisk them on medium speed until they’re frothy. This is the start of your fluffy masterpiece!
Step 3: Sweeten Gradually to Perfection
Adding sugar slowly is your secret weapon here. I add about a tablespoon at a time while continuing to beat, allowing the sugar to dissolve fully. Then bump up your mixer to high and whip until the mixture looks glossy and forms stiff peaks. If you rub a bit between your fingers, you shouldn’t feel sugar granules—that’s how you know it’s just right.
Step 4: Flavor and Color
Beat in your vanilla just until combined—don’t overdo it or the meringue could deflate. Then add green gel food coloring a little at a time until you hit your favorite festive shade. I like rich emerald green, but anywhere from pastel to deep pine is gorgeous. A gentle fold keeps your meringue texture intact.
Step 5: Pipe Your Christmas Trees
Fit a piping bag with a large star tip—I use Wilton 1M—and fill it with your meringue. Now the fun part: pipe tall, swirling tree shapes onto your parchment-lined sheets, spacing about an inch apart so they don’t stick. A couple practice swirls on a plate beforehand can help you find your rhythm.
Step 6: Decorate with Sprinkles
Gently press round sprinkles on your trees for ornaments, then top each with a star sprinkle. The kids always steal this step from me because it feels like decking the halls!
Step 7: Bake Low and Slow, Then Cool
Bake for 45 minutes at that low 200°F, then turn off the oven and let the meringues cool inside with the door closed for at least 2 hours, or overnight if you can wait that long. This slow cooling is what gives you that perfect crisp without cracks—so resist the temptation to peek!
Step 8: Store and Enjoy
Once completely cool, carefully peel your meringue trees off the parchment and store them in an airtight container at room temperature. They’ll keep wonderfully crisp for up to five days (if they last that long!).
Pro Tips for Making Meringue Christmas Tree Cookies Recipe
- Always Use Room Temperature Egg Whites: They whip up more easily and give you better volume for those perfect peaks.
- No Grease Allowed: Even a tiny spot of oil in your bowl or on your whisk will ruin the meringue’s ability to rise, so clean well.
- Sugar Patience Pays Off: Adding sugar slowly and ensuring it fully dissolves means a smooth, glossy meringue that won’t weep or collapse.
- Resist the Oven Door Temptation: Keeping the oven closed during cooling prevents cracks and helps your trees stay crisp and perfect.
How to Serve Meringue Christmas Tree Cookies Recipe
Garnishes
I adore topping these trees with classic red and white sprinkles for that true Christmas vibe—little round red sprinkles look just like ornaments to me! Sometimes I add edible silver pearls or tiny star sprinkles for elegance. They really spark joy on cookie platters.
Side Dishes
Serve your meringue trees alongside hot cocoa with whipped cream or a spiced tea for that warm holiday feel. They also pair wonderfully with a rich brownie or a creamy cheesecake for a cool-texture contrast that guests rave about.
Creative Ways to Present
I’ve placed mine upright in small mason jars filled with colored sugar to mimic snowy ground—that display instantaneously became a conversation starter at my holiday party. You can also string them on unbreakable food-safe skewers to create edible garlands, or gift them in clear cello bags tied with festive ribbon.
Make Ahead and Storage
Storing Leftovers
I store leftover meringue Christmas trees in airtight containers at room temp, away from humidity (which can make them sticky). Placing a silica gel packet in the container can help keep them extra crisp if you have one. They’ve lasted me up to five days perfectly.
Freezing
Freezing isn’t my go-to for these cookies; I’ve tried it and the moisture ruins that delicate crisp texture. I’d recommend making just what you need or storing at room temp instead for best results.
Reheating
Reheating meringue cookies isn’t necessary since they’re best crisp and fresh. If yours lose some crunch, a quick 5-minute warm-up at 200°F in the oven can help revive them—but be careful not to brown or melt your pretty colors!
FAQs
-
Can I use powdered sugar instead of granulated sugar for the meringue?
It’s best to stick with granulated sugar for this recipe. Powdered sugar contains cornstarch to prevent clumping, which can affect the texture and stability of your meringue. Gradually adding fine granulated sugar helps create that glossy, stiff peak texture.
-
Why do my meringues crack or weep after baking?
Cracking usually happens if you open the oven door too early during the cooling phase or if the oven temperature is too high. Weeping, or liquid forming on the surface, can be a sign that sugar wasn’t fully dissolved or humidity is high. Patience with slow cooling and well-dissolved sugar is key.
-
Can I use egg white substitutes or egg whites from a carton?
Fresh, room temperature egg whites whip best for this recipe. Carton egg whites can work but sometimes don’t whip as well or produce as stable results. If using egg whites from a carton, using cream of tartar is even more important.
-
How do I make my green color more vibrant?
Using concentrated gel food colors gives the most vibrant hues without thinning the meringue batter. Add a little at a time until you reach the perfect shade. Avoid liquid food coloring, which can affect the meringue’s structure.
-
Can I make these cookies in other shapes?
Absolutely! While the tree shape is festive, you can pipe stars, hearts, or any design you like. Just be mindful of size and thickness to maintain even baking and crispness.
Final Thoughts
This Meringue Christmas Tree Cookies Recipe has become one of my favorite holiday traditions because it combines elegance with ease, and it always lights up the room. Baking these little trees feels like sharing a bit of joy with anyone lucky enough to taste them. I hope you enjoy making and eating them as much as I do—don’t forget to grab a friend or kiddo to help with the decorating, because that’s half the fun! Happy holidays and happy baking!
Print
Meringue Christmas Tree Cookies Recipe
- Prep Time: 20 minutes
- Cook Time: 45 minutes
- Total Time: 3 hours 5 minutes
- Yield: 30 servings
- Category: Dessert
- Method: Baking
- Cuisine: American
- Diet: Vegetarian
Description
Delightful Meringue Christmas Trees are light, airy, and festive treats perfect for holiday celebrations. Made with whipped egg whites, sugar, and a touch of vanilla, these green-tinted meringue swirls shaped into Christmas trees are decorated with sprinkles to resemble ornaments and stars, making a charming and elegant dessert or snack.
Ingredients
Meringue Base
- 4 large egg whites room temperature
- ¼ teaspoon cream of tartar
- 1 cup granulated sugar
- 1 teaspoon vanilla extract
- Green gel food coloring
Decorations (Optional)
- Round sprinkles
- Star sprinkles
Instructions
- Preheat Oven and Prepare Baking Sheets: Preheat your oven to 200 degrees Fahrenheit and line two baking sheets with parchment paper to prevent the meringues from sticking.
- Whip Egg Whites: In the bowl of a stand mixer, add the room temperature egg whites and cream of tartar. Beat with the whisk attachment on medium speed until the mixture becomes frothy. Ensure your bowl and whisk are clean and dry before starting.
- Add Sugar Gradually: Slowly add granulated sugar one tablespoon at a time while continuing to beat. Once all sugar is incorporated, increase the speed to high and whip until you achieve stiff, glossy peaks and full sugar dissolution.
- Mix in Vanilla: Beat in the vanilla extract just until combined, being careful not to deflate the meringue.
- Add Color: Incorporate green gel food coloring into the meringue until the mixture is evenly tinted with your preferred shade of green.
- Pipe the Trees: Transfer the green meringue into a piping bag fitted with a large star tip (like Wilton 1M). Pipe tall swirls shaped like Christmas trees onto the prepared baking sheets, spacing them about 1 inch apart for even baking.
- Decorate: Optionally, decorate each tree with round sprinkles as ornaments and place a star sprinkle on the top to resemble the tree topper.
- Bake and Cool: Bake the meringues for 45 minutes, then turn off the oven and let them cool completely inside for at least 2 hours or preferably overnight without opening the oven door to prevent cracking.
- Store Properly: Once cooled, carefully remove the meringues and store them in an airtight container at room temperature to maintain their crisp texture.
Notes
- Store meringues in an airtight container at room temperature for up to 5 days in a cool, dry environment away from humidity.
- Reheating is not necessary as these treats are best enjoyed crisp and fresh.
- Freezing is not recommended because moisture can ruin the texture and crispness of the meringues.
- Use room-temperature egg whites to maximize volume and stability.
- Ensure all equipment (bowls, whisk) is completely clean and dry to achieve perfect peaks.
- Add sugar gradually to help it dissolve fully and avoid graininess in the meringue.
- Do not open the oven door during the cooling period to prevent cracks and ensure even drying.
- Pipe meringues on parchment paper for easy removal after baking.
Nutrition
- Calories: 50 kcal
- Sugar: 12g
- Sodium: 2mg
- Fat: 0g
- Saturated Fat: 0g
- Unsaturated Fat: 0g
- Trans Fat: 0g
- Carbohydrates: 12g
- Fiber: 0g
- Protein: 1g
- Cholesterol: 0mg


