
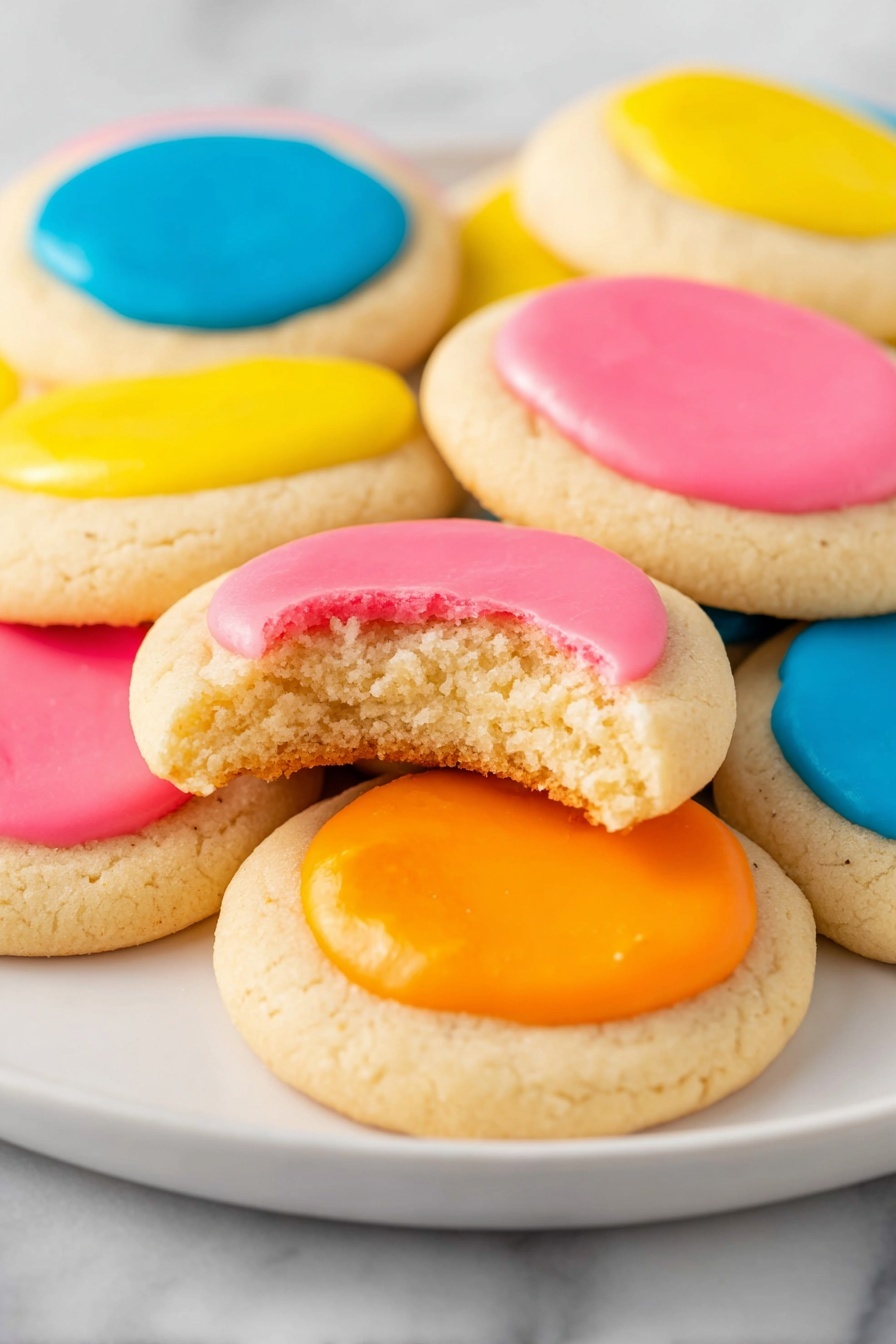
If you’re on the hunt for a sweet treat that’s as charming as it is delicious, you’re in the right place. This Thumbprint Cookies with Icing Recipe is one of those classics I always come back to — simple to make, fun to decorate, and insanely tasty. Whether you’re baking for the holidays, a cozy afternoon, or just because, these cookies bring the perfect homemade touch with a pop of colorful icing that’s just delightful. Stick with me, and I’ll share all my tricks so your cookies come out picture-perfect every time!
Why You’ll Love This Recipe
- Easy to Customize: The icing colors and flavors can be changed up to match any occasion or mood.
- Perfect Texture: Buttery, tender cookies with just the right amount of chew and a delightful crumb.
- Great for All Skill Levels: Whether you’re a beginner or pro, these cookies are straightforward and rewarding to bake.
- Fun for the Whole Family: Kids love filling the indents with colorful icing — it’s an activity and dessert rolled into one!
Ingredients & Why They Work
Every ingredient in this Thumbprint Cookies with Icing Recipe plays a key role. The butter gives the cookies that melt-in-your-mouth richness, while the vanilla adds just the right hint of warmth. The icing, made from powdered sugar and milk, is smooth and sweet and balances the buttery cookie perfectly. Here’s a little breakdown so you aren’t just adding ingredients blindly.
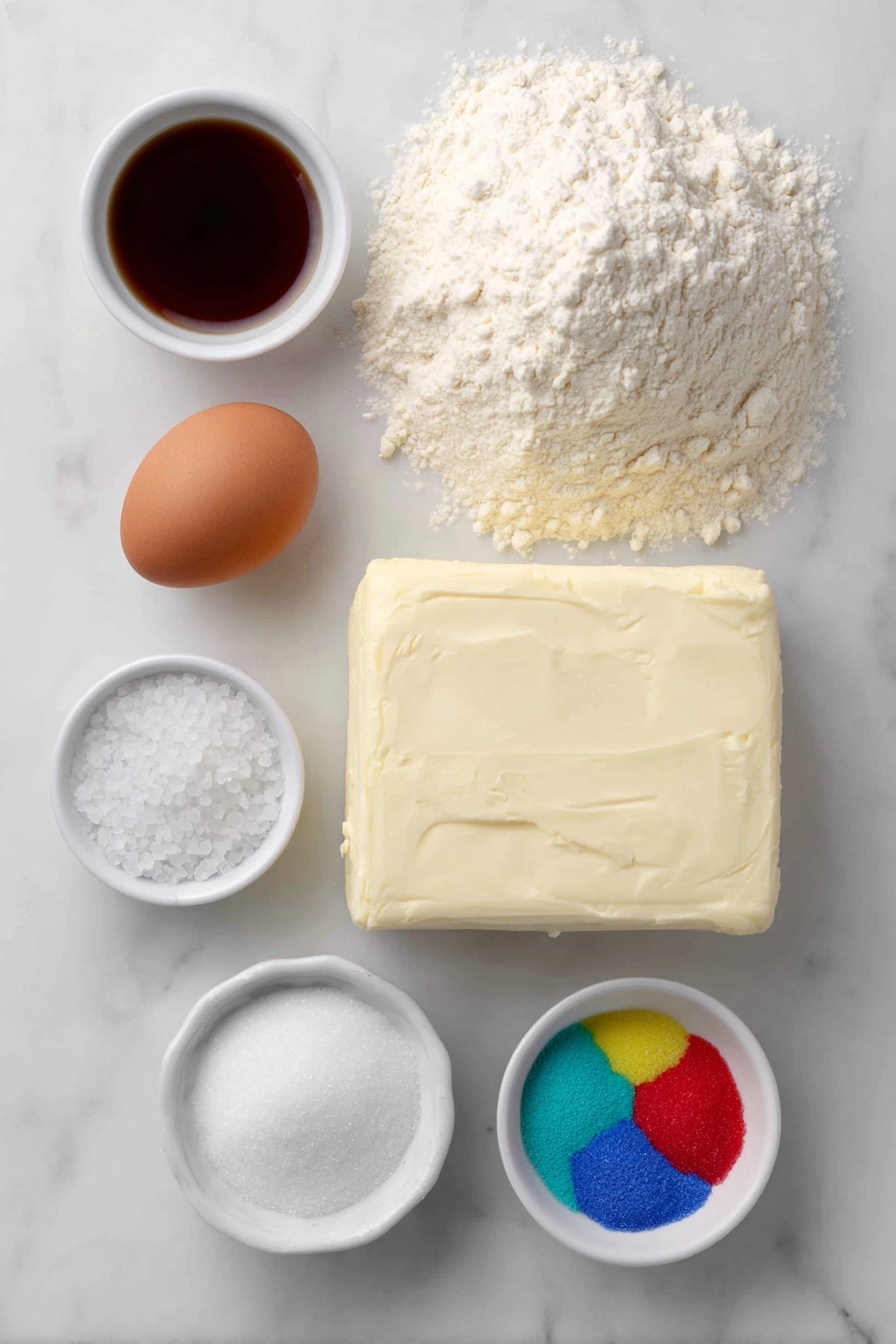
- All-Purpose Flour: Provides the structure for the cookie without being too heavy or cakey.
- Salt: Enhances flavor and balances the sweetness of the sugar and icing.
- Unsalted Butter: Softened for creaming to create that tender, rich base everybody loves.
- Granulated Sugar: Sweetens and helps with that subtle crispness on the edges.
- Large Egg: Acts as a binder for the dough, and gives the cookies a pleasant chewiness.
- Clear Vanilla Flavoring: Adds a lovely aromatic note without any color, so your icing stays bright.
- Powdered Sugar: The key to smooth, sweet icing that fills the indents perfectly.
- Whole Milk: Thins the icing just enough for spreading but keeps it thick enough to hold shape.
- Gel Food Coloring: Provides vibrant colors without watering down the icing. A little goes a long way!
Make It Your Way
This Thumbprint Cookies with Icing Recipe is a fantastic canvas for your creativity. I often like to play with different icing colors for holidays or use a few drops of almond extract instead of vanilla for a nutty twist. Don’t be afraid to make it uniquely yours — this recipe adapts beautifully!
- Variation: One time, I added a hint of lemon zest to the dough and used yellow icing—it made the cookies burst with freshness and looked like sunshine on a plate.
- Dietary Modifications: You can swap butter for a vegan alternative and use almond or oat milk to keep this recipe dairy-free; just expect a slight texture change.
- Seasonal Changes: For the holidays, I love mixing classic red and green icing or even stirring in some cinnamon to the cookie dough for coziness.
Step-by-Step: How I Make Thumbprint Cookies with Icing Recipe
Step 1: Creaming Butter and Sugar to Perfection
Start by softening your unsalted butter to room temperature—that’s key. When you beat the butter and sugar together, aim for a light, fluffy mixture. This usually takes about 2-3 minutes on medium speed with a hand mixer. You’ll notice it changes from dull to silky smooth—that’s exactly what you want before adding the egg and vanilla. Don’t rush this; it really makes a difference in your cookie’s texture.
Step 2: Bringing the Dough Together
Next, add your egg and clear vanilla flavoring, then mix until everything comes together. When you add the dry ingredients—flour and salt—mix on low speed to avoid a floury cloud in your kitchen. Scrape down the sides and bottom of your bowl with a rubber spatula to make sure everything is fully incorporated. The dough should be thick and smooth, just the right consistency to shape.
Step 3: Chill Out & Prep for Shaping
Cover your dough with plastic wrap and pop it into the fridge for at least 30 minutes. Chilling helps firm up the dough which makes it easier to roll into neat balls without getting sticky. I usually let it hang out for about an hour so it’s perfectly firm.
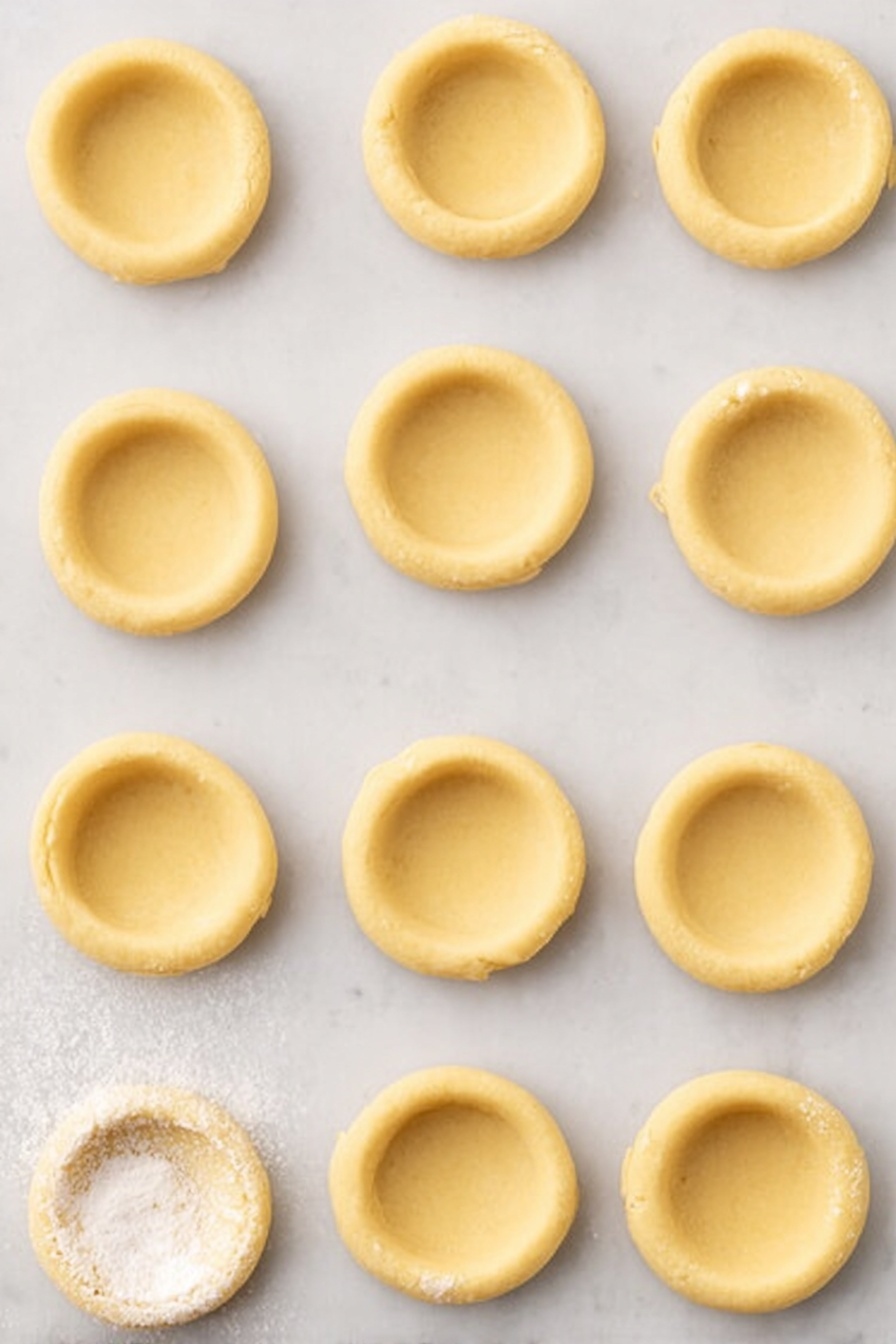
Step 4: Shape, Press, and Bake
Using a tablespoon cookie scoop, portion out the chilled dough and roll into smooth balls. Place them spaced out on parchment-lined trays. Here’s my little secret for perfectly shaped indents: dip your thumb or a small rounded spoon into flour before pressing each dough ball center. This stops sticking and creates a clean circle for your icing. Bake at 350°F for 10-12 minutes until the bottoms just start turning golden. If the indent rises too much, gently press it down when the cookies are still warm—trust me, it helps!
Step 5: Whip Up Your Colored Icing
While the cookies cool completely on a wire rack, mix your icing. Combine sifted powdered sugar, milk, and vanilla, starting with 2 tablespoons milk. You want thick, spreadable icing—not runny—so add more milk sparingly if needed. Drop in your gel food coloring a few drops at a time until your desired shade is achieved. If you’re doing multiple colors, I like dividing the base icing into little bowls and tinting each separately.
Step 6: Fill & Let Set
Carefully spoon or use a small piping bag to fill each cookie’s indent with your colored icing. Avoid overfilling to keep that neat, signature look. Set the iced cookies on the counter at room temperature and give them plenty of time to firm up—you’ll want to wait at least a couple of hours. I usually leave mine out overnight for the best texture before serving or packing.
Pro Tips for Making Thumbprint Cookies with Icing Recipe
- Flour Your Thumb: Always dip your thumb or spoon in flour before pressing the dough—you’ll avoid sticky messes and get crisp, clean indents every time.
- Don’t Skip Chilling: I learned the hard way that warmer dough leads to misshapen cookies, so chilling is essential for smooth shaping.
- Watch the Bake Time: Cookies can go from perfect to overly brown in minutes; take them out right when the edges get a subtle golden tint.
- Let Icing Set Well: This icing won’t harden like royal icing, so patience pays off—set the iced cookies overnight at room temp to get that nice firm-but-soft texture.
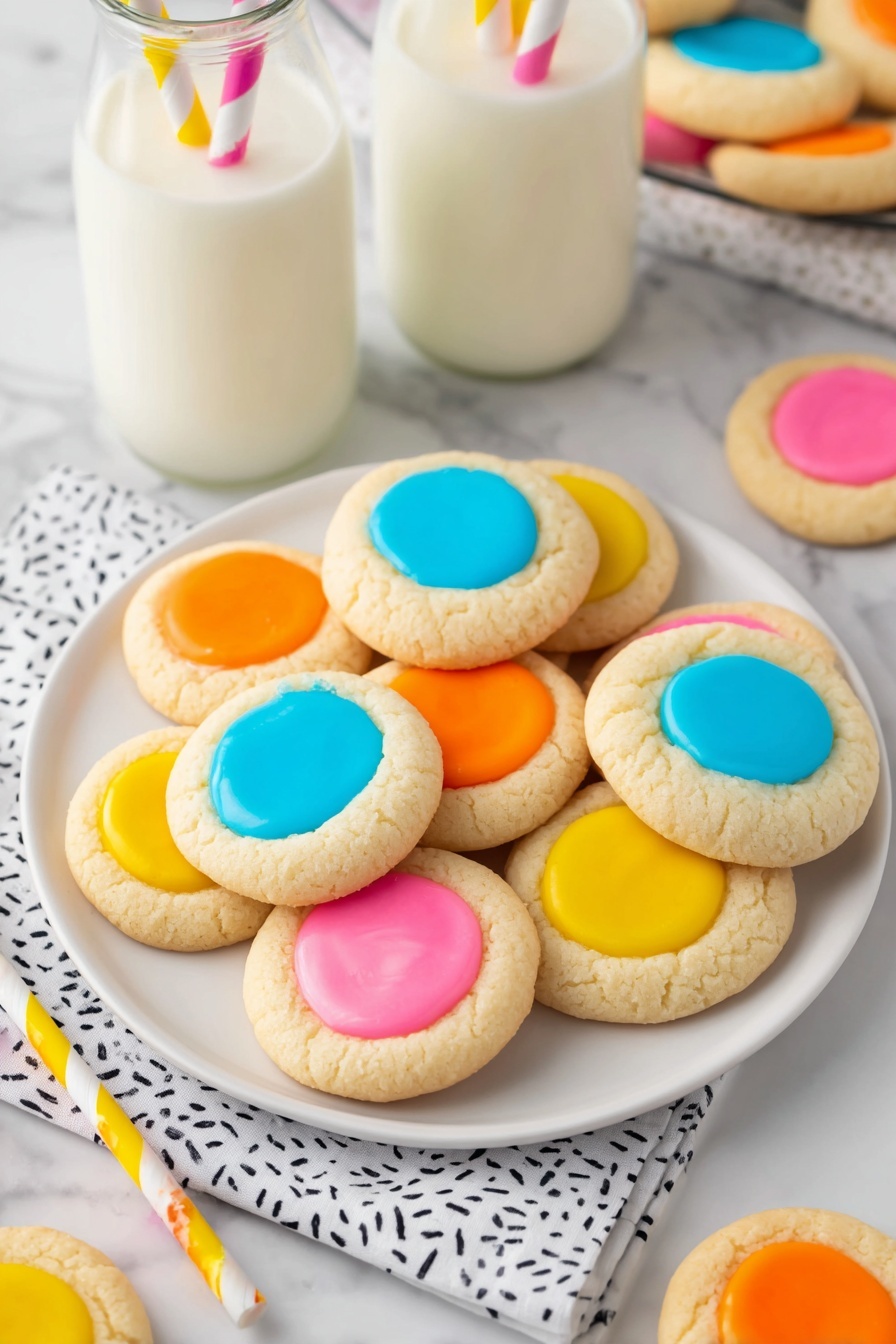
How to Serve Thumbprint Cookies with Icing Recipe
Garnishes
I usually keep it simple with a little sprinkle of finely chopped nuts—like pistachios or almonds—around the icing for extra texture and a pop of color. Sometimes, when I’m feeling fancy, I add a tiny edible pearl or a small pinch of edible glitter to make them shine, especially for special occasions.
Side Dishes
These cookies pair wonderfully with a warm cup of tea or hot cocoa. One time, I served them alongside a simple fruit compote, and the fruity tang complemented the sweet icing beautifully. If you want to go classic, a glass of cold milk is unbeatable.
Creative Ways to Present
I love arranging these cookies in colorful patterns on a tiered dessert tray for parties—mixing multiple icing colors adds to the visual appeal. For holidays, placing them in small decorative tins tied with ribbons makes for perfect edible gifts. To really impress, try stacking them with parchment squares and topping the box with a handwritten note.
Make Ahead and Storage
Storing Leftovers
I keep leftovers in an airtight container in a single layer at room temperature—this keeps the cookies soft but the icing firm for up to 4-5 days. Avoid stacking right after icing unless you’ve let them set overnight to prevent smudging.
Freezing
For longer storage, I freeze the cookie dough balls before baking. Just scoop and chill them flat in a container or bag for up to 2 months. When ready to bake, thaw dough in the fridge, shape your indents, and bake as usual. I don’t recommend freezing the baked cookies with icing since the texture can suffer.
Reheating
If you want a freshly-baked feel, pop uniced cookies in a 300°F oven for 3-5 minutes to warm them gently. For iced leftovers, serve as is at room temperature since reheating risks melting the icing. Trust me, it’s worth waiting!
FAQs
-
Can I use jam instead of icing for the thumbprint cookies?
Absolutely! Traditionally, thumbprint cookies are filled with jam or preserves, which add a burst of fruity sweetness. Using icing is a fun twist, especially for adding vibrant colors and a smooth finish. If you want to try jam, just spoon a small amount into each indentation right after baking and cooling the cookies.
-
Why is my icing too runny or too thick?
The consistency of your icing depends on the milk amount. Start with 2 tablespoons and add more slowly—1 teaspoon at a time—to reach a thick but spreadable texture. If it’s too runny, add a little more powdered sugar to thicken it. It’s all about balance so the icing stays in the indent without spilling over.
-
Can I prepare the icing ahead of time?
Yes, you can make the icing a few hours or even a day before. Just store it in a covered container at room temperature or in the fridge. If it thickens up too much before you ice your cookies, stir in a tiny bit of milk to loosen it back to the right consistency.
-
How do I prevent the indent from disappearing during baking?
Chilling the dough before baking is your best defense against losing the indent shape. Also, try not to press the indent too deep — about ¾ to 1 inch wide and shallow enough not to go through the dough ball. If the indent puffs up a bit while baking, gently press it down while the cookie is still warm and soft.
Final Thoughts
I can’t recommend this Thumbprint Cookies with Icing Recipe enough—it feels like baking happiness in every bite. I’ve made these for cozy family gatherings, festive parties, and quiet afternoons with friends, and they always bring smiles. Once you try making the dough, pressing those perfect indents, and adding your colorful icing, it’ll become one of your go-to recipes too. So grab your mixing bowl, and let’s make something sweet and special together!
Print
Thumbprint Cookies with Icing Recipe
- Prep Time: 15 minutes
- Cook Time: 12 minutes
- Total Time: 1 hour 15 minutes
- Yield: 24 servings
- Category: Dessert
- Method: Baking
- Cuisine: American
- Diet: Vegetarian
Description
Delightfully buttery and tender Thumbprint Cookies topped with smooth, colorful icing. These classic cookies are perfect for sharing at holidays or any celebration, featuring a soft dough with a charming indentation filled with vibrant, sweet icing.
Ingredients
Cookies
- 2 cups all-purpose flour
- ½ teaspoon salt
- 1 cup unsalted butter softened to room temperature
- ⅔ cup granulated sugar
- 1 large egg room temperature
- 1 teaspoon clear vanilla flavoring
Colored Icing
- 2 cups powdered sugar sifted
- 2-3 tablespoons whole milk
- ½ teaspoon clear vanilla flavoring
- 2-3 drops gel food coloring
Instructions
- Prepare Dry Ingredients: In a medium bowl, combine the all-purpose flour and salt. Set aside for later use.
- Cream Butter and Sugar: In a large mixing bowl, add the softened unsalted butter and granulated sugar. Using a hand mixer on medium speed, cream together for 2-3 minutes until smooth and fluffy.
- Add Egg and Vanilla: To the butter mixture, add the egg and clear vanilla flavoring. Beat for 1-2 minutes until fully incorporated.
- Combine Dry and Wet Ingredients: Add the dry flour mixture to the wet ingredients. Beat on low speed until a thick, smooth dough forms. Scrape the sides and bottom of the bowl with a rubber spatula to fully incorporate the flour.
- Chill Dough: Cover the bowl with plastic wrap and refrigerate for 30-60 minutes to firm up the dough for easier handling.
- Preheat Oven and Prepare Baking Sheets: Preheat the oven to 350°F. Line two large baking sheets with parchment paper and set aside.
- Shape Dough Balls: Using a 1 tablespoon cookie scoop, scoop out two tablespoons of chilled dough and roll it into a smooth ball. Place balls onto the prepared baking sheets spacing them about 2 inches apart.
- Make Indentations: Using a small rounded measuring spoon or your thumb dipped lightly in flour, press an indentation about ¾ – 1 inch wide into the center of each dough ball, flattening slightly but not completely through.
- Bake Cookies: Bake in the preheated oven for 12 minutes or until the bottom edges turn lightly golden.
- Cool Cookies: Remove cookies from oven and let them cool on the baking sheets for 5 minutes. Then transfer to a wire rack to cool completely before icing.
- Prepare Icing: In a large bowl, whisk sifted powdered sugar with 2 tablespoons milk and ½ teaspoon vanilla until smooth and thick but spreadable. Add more milk one teaspoon at a time up to 1 tablespoon total to reach desired consistency.
- Color Icing: Add 2-3 drops gel food coloring to the icing and stir until uniform color is achieved. Repeat if preparing multiple colors.
- Fill Indentations: Using a small spoon or piping bag with the tip cut off, carefully fill each cookie indentation with colored icing, avoiding overfilling.
- Allow Icing to Set: Let iced cookies sit at room temperature until icing firms up before serving or storing.
Notes
- Store iced thumbprint cookies at room temperature in a single layer inside an airtight container for 4-5 days.
- You can freeze unbaked dough balls or baked cookies without icing for up to 2 months in an airtight container; thaw dough in refrigerator before baking.
- Dip your thumb or spoon in flour before pressing into the dough to prevent sticking.
- If indentations rise too much during baking, gently press down while cookies are still warm to redefine the well.
- Allow icing to firm overnight at cool room temperature before stacking as it won’t harden like royal icing.
Nutrition
- Calories: 155 kcal
- Sugar: 11 g
- Sodium: 35 mg
- Fat: 8 g
- Saturated Fat: 5 g
- Unsaturated Fat: 2 g
- Trans Fat: 0 g
- Carbohydrates: 20 g
- Fiber: 0 g
- Protein: 1 g
- Cholesterol: 28 mg


