
If you’re craving a fresh, melt-in-your-mouth sweet treat that’s as fun to make as it is to eat, you’re in the right place. Today, I’m sharing my all-time favorite Cream Cheese Mint Candies Recipe—a bright, colorful twist on a classic that’s guaranteed to wow your friends and have you sneaking mint after mint. These candies are creamy, perfectly minty, and come in vibrant neon colors that make them extra special. Stick with me, and I’ll walk you through every step to make sure your candies come out just right!

Why You’ll Love This Recipe
- Easy to Make: My creamy mixture comes together quickly with simple ingredients you probably already have.
- Fun, Vibrant Colors: Neon pink, green, and blue turn these candies into little eye-catching delights perfect for parties or gifts.
- No-Bake Treat: No oven required—just a little mixing, kneading, and patience while they set.
- Perfect Mint Flavor: Just the right touch of mint extract for a fresh, not overpowering, taste everyone will love.
Ingredients & Why They Work
This recipe nails that perfect balance of creamy, sweet, and minty by combining softened cream cheese and butter with powdered sugar and just a touch of mint extract. The neon gel food coloring is the fun part, giving the candies their signature pop without altering flavor or texture.
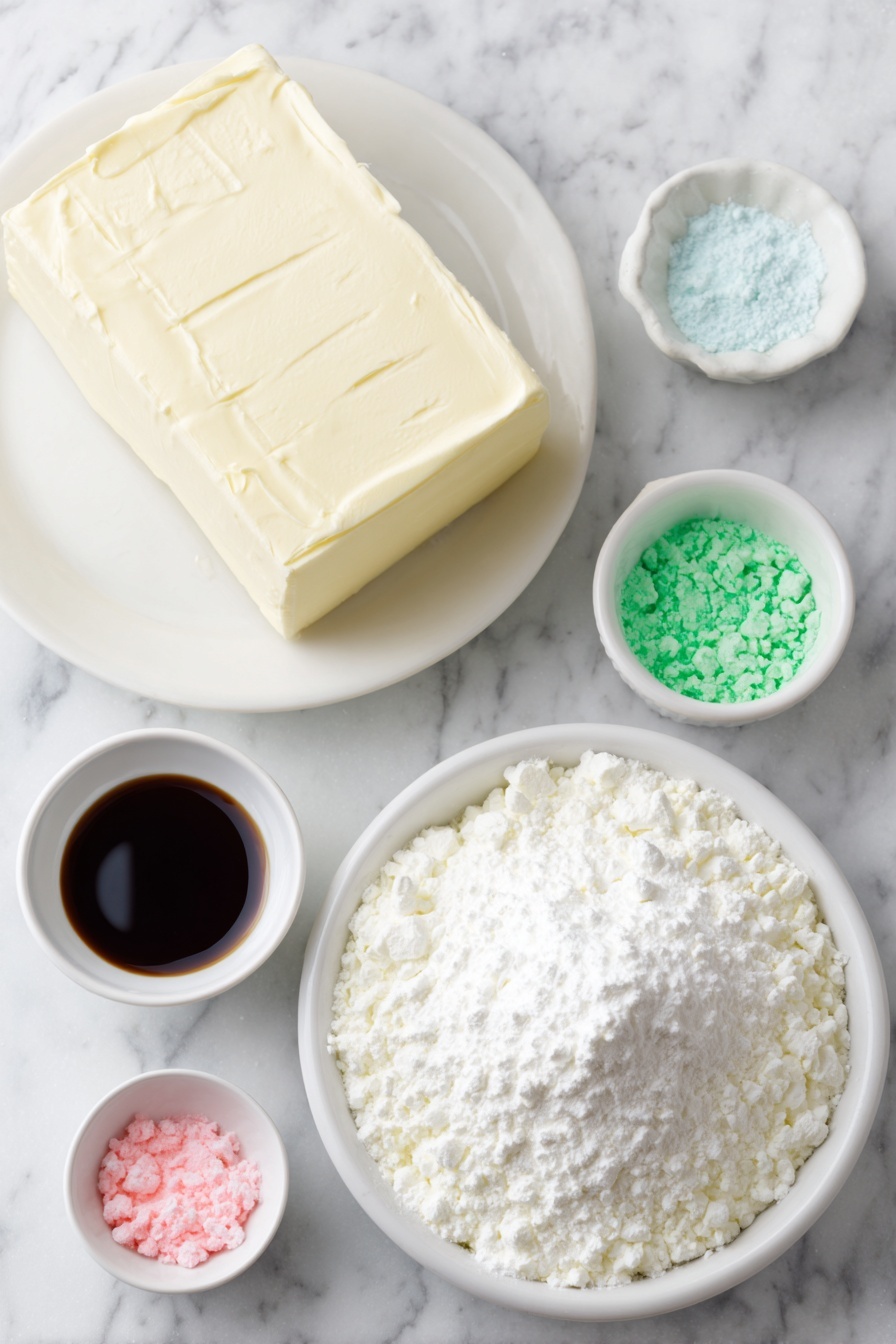
- Cream Cheese: Softened cream cheese provides the creamy base and rich texture that makes these mints melt beautifully on your tongue.
- Butter: Butter adds a smooth, slightly decadent touch and helps the candies hold their shape.
- Powdered Sugar: This sweetens the mixture evenly and keeps the texture silky and smooth without graininess.
- Mint Extract: Just a half teaspoon delivers that bright, cooling flavor you expect from mint candies.
- Gel Food Coloring: Neon green, neon pink, and classic blue inject fun and festive color without watering down the candy mixture.
Make It Your Way
One of my favorite things about this Cream Cheese Mint Candies Recipe is how easy it is to customize. I love mixing up the colors depending on the season or occasion—imagine red and green for Christmas or pastels for spring. And if you’re into different flavors, a splash of vanilla or even almond extract can change things up!
- Color Choices: I’ve tried orange and purple for Halloween, and trust me, they look amazing and taste just as fresh.
- Flavor Twists: If you want to experiment, lemon extract or peppermint oil can be fun alternatives—just start with a tiny amount to avoid overpowering the candy.
- Dietary Tweaks: To make them dairy-free, you could swap in vegan cream cheese and butter—though texture might change slightly.
Step-by-Step: How I Make Cream Cheese Mint Candies Recipe

Step 1: Blend Your Base Mix
Start by placing the softened cream cheese, butter, mint extract, and powdered sugar into a large mixing bowl. I usually use my electric hand mixer for 3 to 4 minutes. The mixture looks really crumbly at this point—that’s totally normal! Keep mixing until it stops changing and looks evenly combined, then get ready to work some magic by hand.
Step 2: Knead, Divide & Color
Put your electric mixer away and start kneading the mixture by hand on your countertop or in the bowl. It’ll come together to a playdough-like consistency — if it’s sticky, add a tablespoon more of cream cheese. Next, roll it into a round ball and slice it evenly into four pieces. Pop each piece into a small bowl for coloring. I add 3-4 dots of gel food coloring per bowl—remember to wash your hands between handling each color to avoid mixing. Gently fold the color in with your hands or a fork until the shade is uniform. One piece stays white, giving you that classic vibe.
Step 3: Shape Your Mints
Line a baking sheet with parchment paper. Then, scoop out teaspoon-sized portions from each colored bowl and roll them into balls—don’t overthink it; they don’t have to be perfect. Place each ball on the sheet. For that signature mint candy flattening, dip a fork into some powdered sugar and gently press onto each ball to flatten it about halfway down. It adds a subtle texture and prevents sticking.
Step 4: Patience Pays Off—Rest & Enjoy
Let your candies rest uncovered at room temperature for 4 to 6 hours. This resting time allows them to firm up so they hold their shape but still feel creamy in the center. After this, the best part: tasting and sharing your beautiful, homemade Cream Cheese Mint Candies!
Pro Tips for Making Cream Cheese Mint Candies Recipe
- Softening Matters: Make sure your cream cheese and butter are completely softened to room temperature—this makes mixing easier and yields a smoother candy.
- Mixing Technique: Start with your electric mixer, then switch to kneading by hand to bring everything together perfectly without overworking the ingredients.
- Color Mixing Tip: Gel food coloring works best for vibrant hues—avoid liquid coloring as it can make things too wet and sticky.
- Storage Reminder: Store your candies in an airtight container in the fridge—they keep well for up to two weeks (though they never last that long in my house!).
How to Serve Cream Cheese Mint Candies Recipe

Garnishes
I like to display mine on a simple white plate with a few fresh mint leaves scattered around. Not only does it emphasize that cool mint vibe, but the greenery really pops against those fun neon colors—such an easy way to elevate your presentation.
Side Dishes
These candies are sweet little palate cleansers after rich meals, so I love pairing them with a cup of coffee or hot tea. They also make a charming addition to dessert trays alongside chocolate truffles or fruit tarts.
Creative Ways to Present
For parties, I’ve arranged them in little pastel cupcake liners or packed them in clear cello bags tied with colorful ribbon to give as homemade gifts. Using a tiered candy stand also creates a festive look that’s just begging to be picked at.
Make Ahead and Storage
Storing Leftovers
When I have leftovers (rare, but it happens!), I store these candies in an airtight container in the fridge. They hold their creamy texture wonderfully for up to two weeks, so you can enjoy them over time without worrying about drying out.
Freezing
Freezing these mints works well too. I separate layers with parchment paper and seal them tightly in freezer bags or containers. When I want a sweet nibble, I thaw them in the fridge overnight—the texture remains smooth, and they taste just like fresh-made.
Reheating
Since these candies are best served cool or at room temp, I don’t really heat them up. If you prefer softer candies, just leave them out for a bit to warm up slightly before eating, but avoid microwaving to prevent melting.
FAQs
-
Can I use vanilla extract instead of mint extract?
Absolutely! Vanilla extract will give your candies a sweet, creamy flavor instead of mint. Stick to the same amount, and you’ll end up with delicious vanilla cream cheese candies that are equally delightful.
-
Why is my candy mixture too sticky?
Sticky mixture usually means your cream cheese or butter wasn’t quite softened enough or you added too much liquid coloring. Try adding a tablespoon more powdered sugar or an extra tablespoon of cream cheese while kneading to get that perfect playdough consistency.
-
How long do Cream Cheese Mint Candies last?
Stored properly in an airtight container in the refrigerator, these candies stay fresh for up to two weeks. For longer storage, freeze them and thaw before serving.
-
Can I make these candies gluten-free?
Yes! This recipe is naturally gluten-free as it uses cream cheese, butter, powdered sugar, and extract. Just double-check your powdered sugar and extracts to be sure they don’t have additives with gluten.
Final Thoughts
This Cream Cheese Mint Candies Recipe has been a sweet staple in my kitchen for years—and every time I make it, it brings back happy memories of sharing little bites of joy with friends and family. The creamy texture, the refreshing mint, and those popping neon colors make it a treat that truly stands out. I hope you’ll give it a try soon and find it as fun and rewarding to make as I do—it’s a small homemade indulgence that feels like a big celebration. Happy candy making!
Print
Cream Cheese Mint Candies Recipe
- Prep Time: 10 minutes
- Cook Time: 0 minutes
- Total Time: 6 hours 10 minutes
- Yield: 40 servings
- Category: Dessert
- Method: No-Cook
- Cuisine: American
- Diet: Vegetarian
Description
These Cream Cheese Mints are a colorful, melt-in-your-mouth confection perfect for parties and special occasions. Made with cream cheese, butter, powdered sugar, and mint extract, they are easy to prepare and refrigerated for a few hours to set. The recipe includes vibrant neon and classic food colorings to create fun pastel mints that look as delightful as they taste.
Ingredients
Base Ingredients
- 4 ounces cream cheese softened to room temperature
- 1 tablespoon butter softened
- 4 cups powdered sugar
- ½ teaspoon mint extract
Coloring
- Neon green gel food coloring
- Neon pink gel food coloring
- Classic blue gel food coloring
Instructions
- Combine Ingredients: In a large mixing bowl, add 4 ounces softened cream cheese, 1 tablespoon softened butter, ½ teaspoon mint extract, and 4 cups powdered sugar.
- Mix with Electric Mixer: Use an electric hand or stand mixer to blend the mixture for 3-4 minutes. The mixture will initially be very crumbly.
- Knead by Hand: Put away the mixer, then continue mixing by hand to knead the mixture until it forms a smooth round ball.
- Divide the Dough: Using a sharp knife, cut the dough ball into 4 equal parts and place each portion in separate small bowls.
- Add Food Coloring: Add 3-4 dots of gel food coloring to three of the bowls (neon green, neon pink, and classic blue). Leave one bowl uncolored for white mints. Mix the coloring in by hand or with a fork until fully blended.
- Prepare Baking Sheet: Line a large baking sheet with parchment paper for placing the mints.
- Form the Mints: Roll 1 teaspoon sized balls from each colored bowl and place them on the prepared baking sheet.
- Flatten Mints: Dip a fork in powdered sugar and gently press into each ball to flatten it about halfway down, creating a mint shape.
- Rest the Mints: Allow the mints to rest at room temperature for 4-6 hours to firm up before serving.
Notes
- Store the mints in an airtight container in the refrigerator for up to 2 weeks.
- Freeze the mints in airtight containers or freezer bags with parchment paper between layers for a few months. Thaw in the fridge before serving.
- You will need both neon and traditional gel food coloring packets to get the vibrant pastel colors.
- The mixture will be crumbly first; blending with an electric mixer for 3-4 minutes is essential before kneading by hand.
- Ensure butter and cream cheese are fully softened for the best texture.
- The final dough should feel like playdough and should not be sticky; add 1 additional tablespoon cream cheese if needed.
- Mix colors by hand for an even, solid color.
- Wash hands between handling different colored dough portions to prevent color transfer.
Nutrition
- Calories: 56 kcal
- Sugar: 14 g
- Sodium: 3 mg
- Fat: 3 g
- Saturated Fat: 2 g
- Unsaturated Fat: 1 g
- Trans Fat: 0 g
- Carbohydrates: 14 g
- Fiber: 0 g
- Protein: 0 g
- Cholesterol: 3 mg


