
If you’re anything like me and you love chocolatey, melt-in-your-mouth treats that are also fun to make, you’re in for a serious delight. Today, I’m sharing my all-time favorite Cool Whip Chocolate Candy Bites Recipe that feels fancy but couldn’t be simpler. These little bites are rich, creamy, and have that perfect balance of fluff and chocolate that’ll have you sneaking more than one (or 10). Trust me, you’re gonna want to keep reading because this recipe is fan-freaking-tastic and perfect for impressing guests or satisfying late-night sweet cravings.
Why You’ll Love This Recipe
- Effortless Elegance: It looks like you spent hours, but really it comes together with minimal steps and easy-to-find ingredients.
- Creamy & Luscious Texture: The Cool Whip adds a fluffy, dreamy quality that makes these candy bites so addicting.
- Perfect for Chill & Serve: You make them ahead, refrigerate overnight, and serve up a cool treat that holds shape beautifully.
- Customizable & Crowd-Pleasing: Easy to tweak for flavors or coatings to suit your taste or occasion.
Ingredients & Why They Work
Each ingredient in the Cool Whip Chocolate Candy Bites Recipe plays a special role in making sure these treats are smooth, creamy, and perfectly chocolatey. You don’t need anything fancy—just a few staples that come together to impress every time.

- Milk Chocolate Chips: These provide the rich, sweet chocolate base—you want good quality for a smooth melt and great flavor.
- Frozen Whipped Topping (thawed): This is the secret fluff factor that makes the candy bites creamy and light in texture; be sure not to use fresh whipped cream as it won’t hold the same consistency.
- Chocolate Melting Wafers: These are perfect for dipping the bites because they melt smoothly and harden up nicely for that professional finish.
- Vegetable Oil: Added to melted chocolate to give it that silky fluidity, making dipping easier and preventing clumpy chocolate coating.
Make It Your Way
One of the best things about this Cool Whip Chocolate Candy Bites Recipe is how easy it is to make your own. I’ve tried swapping out chocolate types, adding nuts, even mixing in some peppermint extract for the holidays—so don’t hesitate to get creative!
- Variation: For a richer taste, I sometimes swap half the milk chocolate chips for dark chocolate chips—it adds depth and a subtle bitterness that balances the sweetness perfectly.
- Dietary Modifications: If you want to keep it dairy-free, try a coconut-based whipped topping and vegan chocolate melts—I’ve had good results with those.
- Texture Twist: Sprinkle crushed nuts or mini candy pieces over the top right before chilling for an extra crunch and pop of color.
Step-by-Step: How I Make Cool Whip Chocolate Candy Bites Recipe
Step 1: Prep Your Pan Like a Pro
Start by lining an 8×8-inch pan with parchment paper, making sure the paper hangs over the edges just enough to lift the set candy out once chilled. This little trick makes cutting and popping the candy bites out so much easier later. Pro tip: don’t skip parchment—it keeps cleanup a breeze and saves your candies from sticking.
Step 2: Melt & Oil Your Milk Chocolate Chips
Microwave your milk chocolate chips on 50% power for 1 minute. Stir well; then add 1 tablespoon of vegetable oil to make that chocolate silky smooth. Continue microwaving in 30-second bursts, stirring each time, until there are zero chunks and the texture looks glossy. The oil here is your best friend—it thins the chocolate just enough so it blends perfectly with the Cool Whip.
Step 3: Combine the Whipped Topping
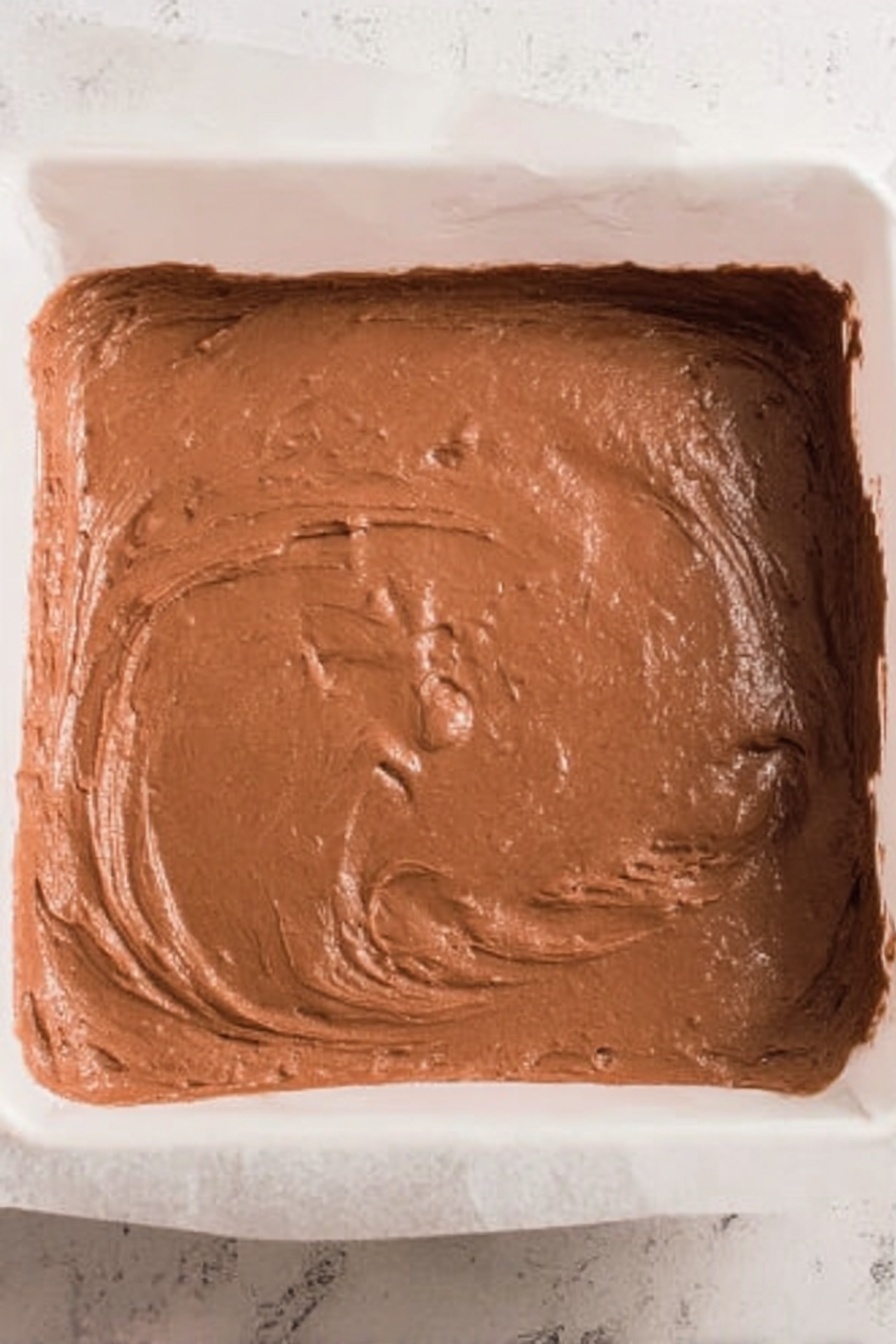
Fold the thawed frozen whipped topping into your melted chocolate mix using a rubber spatula. This part takes a little muscle—stir until the mixture is uniformly blended and thickened. It will look dense but don’t worry, that’s exactly the creamy texture you want for the base of your candy bites.
Step 4: Spread & Chill
Pour this luscious mixture into the prepared pan, scrapping every last bit out of your bowl. Use the spatula to smooth it flat and press it firmly into all pan corners. This step ensures even thickness, so your candies set uniformly. Pop it in the fridge and chill for at least 6 hours or overnight—this slow chill sets the texture perfectly.
Step 5: Slice Your Candy Bites
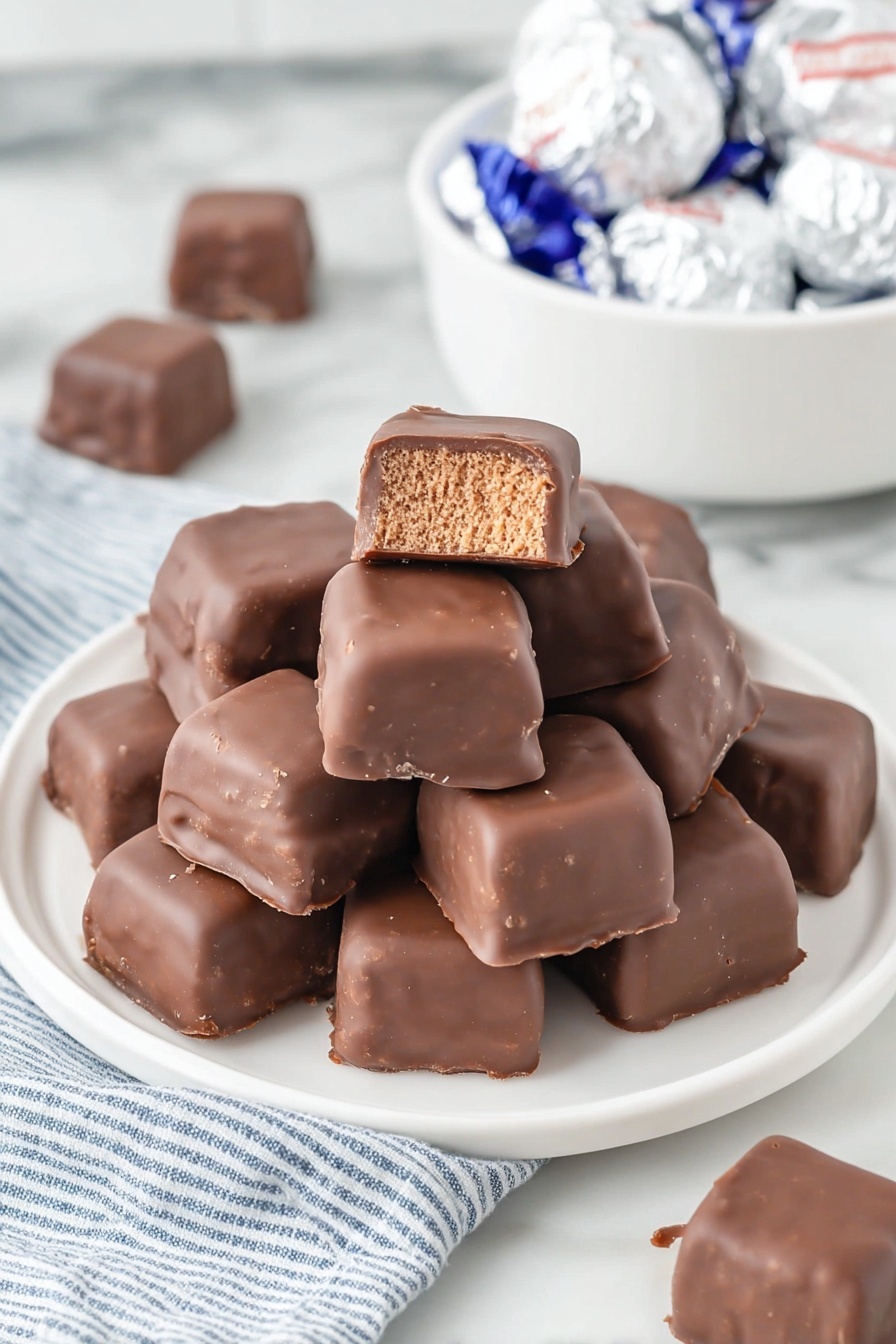
Pull the set chocolate from your pan by grabbing the parchment edges, then slice into roughly 1 ½ inch pieces—about 5 cuts per side. Place these raw squares on a chilled baking tray to keep them firm as you prepare your coating. Keeping them cold makes the next step less messy, plus it helps with a crisp chocolate shell.
Step 6: Melt & Prepare the Dipping Chocolate
Pop your Ghirardelli melting wafers into the microwave at 50% power for 1 minute, stir and add the remaining 1 tablespoon vegetable oil. Continue microwaving for 30-second intervals, stirring until perfectly smooth. This silky chocolate lends a gorgeous shiny coat and snap when set, just like a candy shop treat.
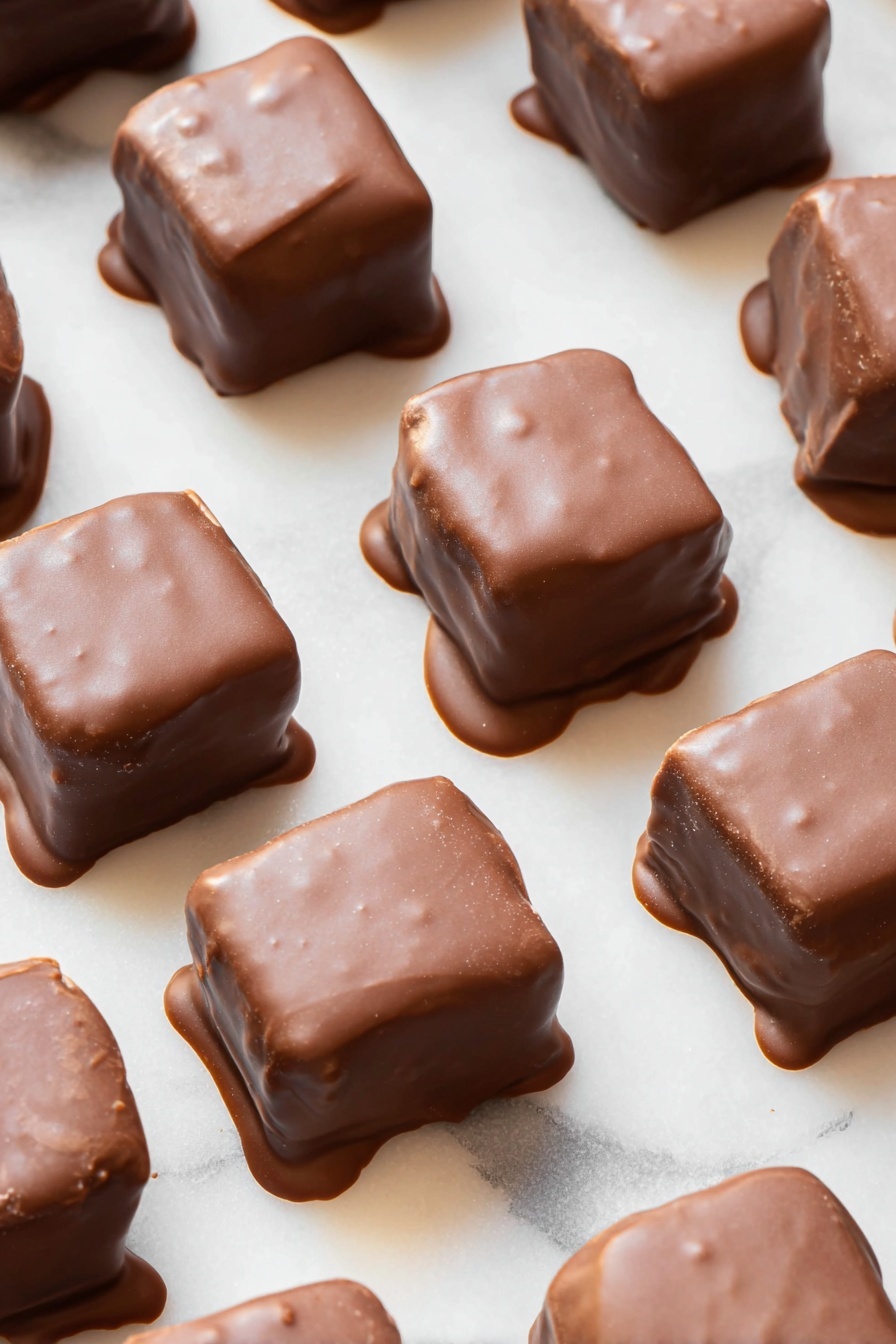
Step 7: Dip, Chill, & Enjoy!
Using two forks or your favorite dipping tools, dunk each chilled candy bite into the melted chocolate, covering completely. Let excess drip off and place back on the baking sheet. Repeat with all bites, then refrigerate for at least 30 minutes before serving. The end result? Silky inside with a crisp chocolate exterior that melts in your mouth.
Pro Tips for Making Cool Whip Chocolate Candy Bites Recipe
- Don’t Rush the Chill Time: The candy needs a solid 6 hours or overnight to properly firm up; cutting too soon makes it messy and soft.
- Use 50% Power in Microwave: Melting chocolate gently prevents scorching and graininess—stir often for a silky smooth texture.
- Keep the Candy Bites Cold When Dipping: This helps the coating set quickly and reduces chocolate dripping all over your hands.
- Sharp Knife Is a Game Changer: For clean, even cuts, use a sharp knife and wipe between slices to avoid sticky messes.
How to Serve Cool Whip Chocolate Candy Bites Recipe
Garnishes
I like to sprinkle a tiny pinch of sea salt flakes or crushed freeze-dried raspberries on top right after dipping—but before chilling. It adds a pop of color and a little contrast to the sweetness. Another favorite is a dusting of cocoa powder or even edible glitter for festive parties.
Side Dishes
These bites pair wonderfully with a cup of rich coffee or creamy hot chocolate—perfect for a cozy dessert setup. For parties, I also like serving fruit platters alongside to balance out that chocolate richness.
Creative Ways to Present
Try arranging the candy bites on a tiered dessert stand or inside elegant, mini cupcake liners for an instant wow factor at gatherings. If you want a seasonal touch, you can add themed toppers like tiny candy canes or edible flowers—I’ve even wrapped individual bites in cellophane with ribbons as sweet party favors.
Make Ahead and Storage
Storing Leftovers
I store leftover Cool Whip Chocolate Candy Bites in an airtight container in the fridge to keep them firm and fresh. They stay perfect for about 5 to 7 days, and honestly, they never last that long in my house!
Freezing
If you want to make a big batch in advance, individually wrap each bite in plastic wrap and then place them in a freezer-safe bag. They’ll freeze well for up to 2 months. When you’re ready to enjoy, thaw them slowly in the refrigerator overnight—this really helps them keep their texture.
Reheating
These candies don’t really require reheating since they’re best served chilled. If they’ve warmed up too much, just pop them back into the fridge for a bit to regain their crisp coating and creamy middle.
FAQs
-
Can I use fresh whipped cream instead of frozen whipped topping for this recipe?
It’s tempting, but fresh whipped cream won’t give you the same stability and texture as frozen whipped topping. The frozen whipped topping helps the candy mixture hold its shape once chilled. If you use fresh whipped cream, the candies may be too soft or runny.
-
What’s the best way to melt chocolate without it seizing?
Microwaving at 50% power in 30-second increments and stirring well between each interval is key. Also, adding a tablespoon of vegetable oil thins the chocolate and prevents it from becoming grainy or seizing.
-
Can I make this recipe gluten-free?
Absolutely! All the main ingredients are naturally gluten-free, but make sure your chocolate chips and whipped topping don’t have any gluten-containing additives. Always check packaging to be safe.
-
How long can I store these candy bites in the fridge?
Stored in an airtight container, Cool Whip Chocolate Candy Bites stay fresh and delicious for up to 5 to 7 days in the refrigerator. For best texture, serve chilled.
Final Thoughts
I can’t recommend this Cool Whip Chocolate Candy Bites Recipe enough. It’s one of those rare desserts that feel fancy but are actually slightly lazy—perfect for busy days, last-minute gifts, or whenever that sweet tooth calls. What I love most is how adaptable it is and how often friends ooh and ahh over them at get-togethers. Give this recipe a try—you’ll be hooked, just like I was the first time I made it.
Print
Cool Whip Chocolate Candy Bites Recipe
- Prep Time: 30 minutes
- Cook Time: 5 minutes
- Total Time: 6 hours 35 minutes
- Yield: 36 pieces
- Category: Dessert
- Method: No-Cook
- Cuisine: American
Description
This Cool Whip Candy Recipe features a luscious blend of melted milk chocolate chips combined with creamy whipped topping, then coated in rich Ghirardelli chocolate for an irresistible treat. With simple steps and minimal ingredients, it’s a perfect no-bake candy that sets in the refrigerator to create smooth, silky pieces ideal for satisfying your sweet tooth.
Ingredients
Main Ingredients
- 11.5 ounces milk chocolate chips (one package)
- 8 ounces tub of frozen whipped topping, thawed at room temperature
- 10 ounces bag of Ghirardelli chocolate melting wafers
- 2 tablespoons vegetable oil, divided
Instructions
- Prepare baking pan: Line an 8×8 inch pan with parchment paper to ensure easy removal and avoid sticking. Set aside.
- Melt milk chocolate chips: Place chocolate chips in a large microwave-safe bowl. Microwave at 50% power for 1 minute. Stir thoroughly and add 1 tablespoon vegetable oil. Continue microwaving at 50% power in 30 second intervals, stirring after each, until the chocolate is silky smooth. Remove from microwave.
- Combine with whipped topping: Add the thawed whipped topping to the melted chocolate. Stir well with a rubber spatula until fully combined into a thick mixture.
- Transfer mixture to pan: Pour the chocolate and whipped topping mixture into the prepared 8×8 pan. Use the spatula to scrape down the sides of the bowl ensuring all mixture is transferred.
- Level the surface: Press the mixture down and out evenly to make it flush against the pan edges and corners, smoothing the top surface.
- Chill the candy base: Place the pan in the refrigerator and chill for 6 hours or preferably overnight until firm.
- Cut into pieces: Remove the chilled candy by lifting the parchment paper out of the pan. Using a sharp knife, cut the candy into approximately 1½-inch pieces by making 5 cuts on each side.
- Arrange candies for dipping: Place the individual pieces on a large baking dish and refrigerate to keep chilled while preparing the coating chocolate.
- Melt melting wafers: Place Ghirardelli melting wafers into a microwave-safe bowl. Microwave at 50% power for 1 minute, then stir well and add the remaining 1 tablespoon vegetable oil. Continue microwaving at 50% power in 30 second intervals, stirring after each until the chocolate is smooth. Remove from microwave.
- Dip candy pieces: Using two forks or candy dipping tools, dip each candy piece completely into the melted chocolate coating. Place the dipped pieces back on the baking dish.
- Set the coated candies: After all candies are coated, place the baking dish back in the refrigerator for 30 minutes to allow the chocolate shell to harden before serving.
Notes
- Store candy in an airtight container in the refrigerator for 5 to 7 days, best enjoyed cold for optimal texture.
- No reheating needed; serve chilled directly from the fridge for classic taste and texture.
- To freeze, wrap each piece in plastic wrap then place in a freezer-safe bag. Freeze for up to 2 months and thaw in refrigerator before serving.
- Do not skip chilling steps between stages to ensure candy sets properly and has the ideal consistency.
- Use parchment paper to line the pan for easy removal and clean edges.
Nutrition
- Calories: 138 kcal
- Sugar: 12 g
- Sodium: 15 mg
- Fat: 13 g
- Saturated Fat: 9 g
- Unsaturated Fat: 3 g
- Trans Fat: 0 g
- Carbohydrates: 14 g
- Fiber: 0 g
- Protein: 1 g
- Cholesterol: 3 mg


